LAB 8
Stunts
Lab 8 was a very exciting lab, where all our work from the previous labs came together. This lab is the final leg of the Labs 6-8 series, where in the first part, we developed a PID controller to perform a task on the robot, increased its speed in the next lab using a Kalman Filter, and now we combine both the systems to perform a complete stunt. Finally, once the designated stunt had been successfully completed, we had the opportunity to perform any stunt of our own choice! Thinking about a cool stunt to do was especially fun, even though I was not able to bring most of my wild ideas to life.
Task B: Drift Much?
In Lab 6, I had chosen to perform Task B: Drift Much, in which the robot was supposed to move forward, turn around by 180°, and come back. This involved implementing a PID control for the orientation of the robot, which spun it on the spot until the desired yaw angle was reached (for this task, 180°). For Lab 7 we went a different direction and implemented a Kalman Filter on the front TOF sensor of the robot, such that it predicted the next sensor reading based on the past measurements and the current motor output. For the complete stunt, we were to combine the goals of these two labs to be that the robot moves straight towards a wall until it is a certain distance from the wall, then turns around 180°, and then comes back to where it started from. The objective was to do this set of movements as fast as possible, which cause the car to “drift” near the wall while turning back. The requirements for a successful run were described in the lab handout as: starting from a specified line, touching another line close to the wall while drifting, and coming back to cross the initial line.
Using the Kalman Filter
To work on this lab, I first tried to enhance the Kalman Filter from the last lab. In Lab 7, we implemented a Kalman Filter, first in a Jupyter notebook, followed by on the Artemis, in order to estimate the TOF distance measurements based on the previous measurements, and the motor speeds. This is necessary because the TOF sensor we use in this course is slow (samples once every ~100 ms), which can be dangerous if we are using it to prevent collisions on a fast robot. The Kalman Filter can allow us to “predict” a distance measurement during the cycles in which the actual TOF measurement is not available. This is what needed to be implemented in this lab because earlier, the basic Kalman Filter only estimated the distance when the measurement was available.
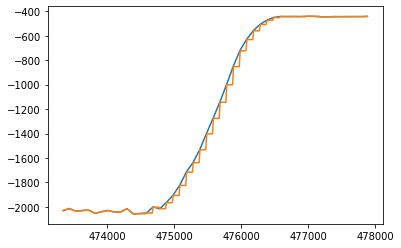
In order to do this, we need another Kalman function that only performs the “predict” step and not the “update” step as no new sensor data is available. I first implemented this on the Jupyter notebook, where I tuned the various parameters to better match the predictions to the truth. Thereafter, I added it as a function to the Kalman filter class, which is called every time the sensor data is not available. The results of the Kalman filter on the robot can be seen in the plots below. While the predictions conform well to the actual distance, the step like response shows that the filter is not so much “predicting” the next distance as it is closely sticking to the last distance measured. Nonetheless, I use it for performing the stunts in this lab.
# Psuedocode for Kalman function implementation showing prediction and update steps
# ' -> Transpose
# ~ -> Inverse

function Kalman (x, sig, u, z):
    # Prediction step
    x_p = Ad.x + Bd.x
    sig_p = Ad.sig.Ad' + sig_u

    # Update step
    KF = sig_p.C'.~(C.sig_p.C' + sig_z)
    x_n = x_p + KF.(z - C.x_p)
    sig_n = (I - KF.C).sig_p

    Return x_n, sig_n
// Implementation of Kalman predict function when distance measurement not available
float predict(int u) {
Matrix<1, 1> u_ = {(float)u};
// Prediction step
Matrix<2, 1> x_p = Ad*x + Bd*u_;
Matrix<2, 2> sig_p = Ad*sig*~Ad + sig_u;
return x_p(0, 0);
} 
Controlled Stunt
The “Drift Much?” stunt to be performed in this lab was very similar to the chosen task in Lab 6 with an addition of a wall which triggers the drift. Therefore the implementation of the stunt primarily involved merging the code of Labs 6 and 7 into a new Bluetooth command, followed by a whole lot of PID tuning. After several trials and collisions with the wall, I determined the threshold distance from the wall when the robot starts drifting to be 1.5 m. This had to be carefully selected such that the robot doesn’t hit the wall, but at the same time, crosses the 0.6m marker near the wall. Even with the Kalman Filter, the threshold distance needed to be this large, which means that the filter isn’t doing a very good job of extrapolating distance measurements, as discussed in the previous section.
Finally, I had implemented the Bluetooth command to perform the stunt according to the psuedocode shown below. Throughout the runs, I had to constantly tune the PID parameters as well as the target setpoint to perform the 180° drift. The scoring of this stunt is based on the time the robot takes to complete it. Therefore, the robot movement should be as fast as it can without hitting the walls, and so does the PID-controlled spin. I used PD control on the robot in order to make the drift faster, I increased the P parameter so that the robot turns quicker, and also the D parameter to reduce overshoot. After several failed attempts, three successful trials of the robot performing this stunt are shown below.
# Psuedocode for stunt implementation
# Actual code not included to keep the snipped brief and legible

# Get initial distance reading and initialize Kalman filter
curr_distance = get_distance()
Kalman.init(curr_distance)

# Go forward until wall
robot.move_forward(max_speed)
while (curr_distance > threshold):
    if sensor_available():
        curr_distance = get_distance()
        Kalman.filter(1, curr_distance)
    else:
        curr_distance = Kalman.predict(1)

robot.fast_stop()

# Get yaw reading
curr_yaw = get_yaw()

# Turn 180 deg from current yaw
target_yaw = curr_yaw + setpoint
while (not done):
    done = turnPID(target_yaw)

# Move back for 2 seconds
robot.move_forward(max_speed)
while (curr_time < start_time + 2000):
    pass

robot.fast_stop()
Open-loop Stunt
In the second part of this lab, we had the opportunity to perform our own stunt on the robot which was allowed to run on open-loop control. In order to control the robot movement like this, I hard-coded a series of motions that run for a period of time to get the desired stunt. This was quite cumbersome a task because of the huge uncertainty in the robot movement. With the same exact timing parameters, the trajectory of the robot is different in each successive run. This experience adds to the importance and convenience of closed-loop control and PID, where we only need to tune a handful of parameters to get repeatable behavior.
To get inspiration for a stunt, I watched several YouTube videos of stunt RC cars and stunt driving, and decided that I wanted to do something with the robot drifting around cones. I first tried doing a zig-zag maneuver on the robot which was quite hard to do because of the range of left and right movements required (bloopers included). I then thought about drifting around one cone multiple times and coded a series of movements for that. After experimenting with the different motions on the robot (forward, backward, turn right, turn left, spin right, spin left, etc.) with a range of different speeds, I was able to achieve a complex drift stunt around the cone. In this stunt, the robot goes in circles around the cone, and during that, also drifts in place several times, forming an interesting 9 shape. This stunt has been demonstrated in the three successful trials below. Over time as the battery of the robot depleted, and quite frankly, as the “mood” of the robot changed, the position of this 9 changed, and so the cone had to be adjusted accordingly. The open-loop control code sequence on the robot has been described in the pseudocode below.
// Arduino loop for open-loop stunt implementation

void loop() {
    int curr_time = millis();

    while (millis() < curr_time + 10000) {
        // Turn left
        analogWrite(motorA_in1, 250);
        analogWrite(motorA_in2, 0);

        analogWrite(motorB_in1, 0);
        analogWrite(motorB_in2, 0);
        delay(500);

        // Go back
        analogWrite(motorA_in1, 0);
        analogWrite(motorA_in2, 250);

        analogWrite(motorB_in1, 0);
        analogWrite(motorB_in2, 250);
        delay(300);
    }

    // Stop
    analogWrite(motorA_in1, 0);
    analogWrite(motorA_in2, 0);

    analogWrite(motorB_in1, 0);
    analogWrite(motorB_in2, 0);

    // Busy wait
    while (1);
}
Bloopers
This was super fun and simultaneously terrifying lab as I saw my robot crash head-on with walls, corners, laptops, with some crashes hard enough that the robot flipped. I have included many of these bloopers in the video below. I’m happy with the results of my robot stunts and just thankful that the robot has survived in the aftermath!